Image Resizer For Mac
Dec 01, 2017 Top 5 Best Image Resizer for Mac Systweak Image Resizer: Systweak Image Resizer is one of the best image resizer apps for Mac that is preferred choice by amateur or professionals. You can use this tool to resize single image, multiple photos, images in Photos library or even large image folders with instant effect.
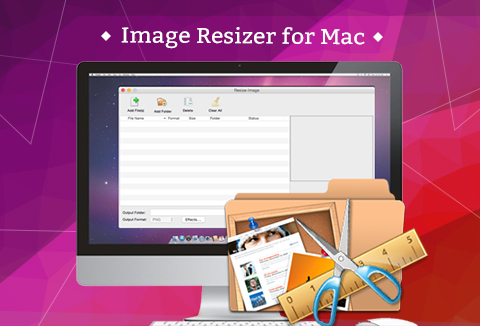
We often need to resize images. Sometimes to send them as email, sometimes to upload them to any website and for various other reasons. Resized images not only solve the purpose of sharing, but they also take lesser space on the drive and at the same time the best batch image resizer for mac can help you to bulk resize images if you want then to fit on a specific frame. If you are a Mac user and looking for a solution to resize images, then you will find many tips and tricks to do this but it is easier to resize images using the application. You can try this best image resizer from Tweaking Technologies to resize images on your Mac. Let us find out more about this application and see how it works.
Here is the list of Key features of this application.
- With this software, you can resize single or multiple images at a time. If you need resized images for the bulk upload.
- This application not only resize images it also converts them to different formats.
- The application is capable enough to deliver high quality results with great speed.
- Some other features like bulk renaming bulk rotation percentage wise compression are also available in the application.
The Best Batch Image Resizer for Mac to Resize Multiple Photos
- You can download this application for your Mac from here-
After the completion of download and installation process you will see the home screen of the application.
- On the home screen, you can add a folder add a file or you can add entire photo library to this application.
- It may take few seconds to add multiple photos Once you are done with adding photos you will see them in thumbnails even after adding images you can delete or remove them. Now click Next to continue.
- Now you can click on Resizesettings to apply different attributes to selected images. Under Resize settings tab there are 3 different tabs which makes this application best image resizer software on mac. These tabs are Resize Flip and Rotate
-you can configure size settings as per pixels or percentage.
-Rotate settings as per 90 degree clockwise, 90 degree antilock and 180 degree rotate.
-There are two options in flip section.
- Proceeding further you can configure output settings you can change location of output folder. Add a prefix or suffix to output files. If you want to convert files in bulk you can change the format from here after uploading bulk files.
- Conversion window: Next you will see conversion window here you can see total number of images converted till now compressed ratio batch name and progress percentage.
- After the completion of conversion, you can also see detailed log
This is how now you can easily convert, Resize or rotate images in bulk. The application is one stop solution for image editing. Now it become simpler for you to bulk resize rotate and change format for images.
So, what are you waiting for Go and grab this best image resizer software on mac. Here is the link-
Conclusion
Image resizer software make it easier for you to resize images quickly according to the purpose of resizing images in bulk. You can use Best Batch Image Resizer for Mac either resize images to upload them on an ecommerce portal or you can also edit them to upload quickly on a social media platform. So, what are you waiting for Go and grab this best image resizer software on mac.
Do you work with a lot of images at one time? Maybe you have a large group of images you need to resize to a consistent size and convert from PNG to JPG. Instead of changing each image separately, there are easy ways to quickly batch convert and resize images on your Mac.
Below, we look at using the built-in tools in Preview and Automator to batch convert and resize images. We’ll also introduce a couple of third-party apps that will do the trick with some extra features thrown in.
For this guide, we’ll combine converting and resizing. But you can also do each separately on your batch of images.
Batch Convert and Resize Images Using Preview
The built-in Preview app has been around a long time on macOS, and you can do much more with Preview 10 Essential Tips and Tricks for Preview on the MacPreview is an unassuming app that can do the job of half a dozen standalone utilities. Read More than just view images. One hidden but useful feature is the ability to batch convert and resize a large group of images with Preview How to Resize Images on Mac Using Photos or PreviewLooking to resize images on your Mac? Here's how to resize images using Preview, Photos, and even alternative apps like Mail. Read More .
In Finder, select a group of image files, and right-click on them. Go to Open With > Preview. If you have the Preview icon on your Dock, you can also drag the selected files onto the Preview icon to open them. From there:
- Click in the left pane then press Cmd + A, or click Edit > Select All from the menu bar to select all the images.
- Select Tools > Adjust Size from the menu bar.
- Choose the units you want to use (pixels, percent, inches, cm, mm, or points) from the dropdown box to the right of the Width and Height fields.
- If you want the Height to adjust automatically when you enter the Width, or vice versa, make sure to check the Scale proportionally box.
- Enter values for one or both the Width and Height and click OK.
- Note that if your images are all different sizes, you may want to use percent, because it’s relative to the original size.
Now, let’s convert the images. Batch image conversion in Preview works with almost all image formats, including GIF, JPEG, JPEG-2000, BMP, Photoshop PSD, PNG, TIFF, and even PDF. You can convert any number of image files using this.
To start converting in Preview:
- Make sure all the images are still selected and go to File > Export Selected Images.
- Navigate to the folder where you want to save the images and click Options to reveal the Format dropdown list.
- Select the desired format, optionally adjust the available settings, and click Choose.
Batch Convert and Resize Images Using Automator
Automator is a powerful, built-in utility on your Mac that allows you to create custom automation apps without knowing any coding. Don’t be intimidated by Automator—it’s easy to use.
Using a custom Automator app to batch convert and resize a group of images is faster than using Preview. Once you create a workflow in the Automator app Learn to Use Mac Automator With 6 Handy Example WorkflowsA little bit of patience and creativity are all you need to start automating your Mac -- you don't need to know a single line of code. Read More , save it as an application, and add it to your Dock, you can simply drag and drop images onto the icon.
To start a new Automator document:
- Open Automator from your Applications folder (or search for it using Spotlight with Cmd + Space) and click New Document.
- On the Choose a type for your document dialog box, click Application and then hit Choose.
There are two main sections on the Automator window: Actions and Variables are on the left, while the workflow is on the right. The process of building an Automator workflow involves selecting the type of Action or Variable you want and then dragging it into your workflow.
In essence, you’re building a step-by-step process that tells Automator what to do with the files you give it.
Create a New Folder
First, we’re going to have Automator create a folder to place the converted and resized images into.
Make sure Actions is selected right under the toolbar. Select Files & Folders under Library on the left. Next, find the New Folder action in the second column and drag it to the workflow on the right. After this, the New Folder action is put in place at the beginning of the workflow, with some options on the action box.
Enter a name for the new folder in the Name box. By default, this new folder will be created on the Desktop, but you can choose another location using the Where dropdown list.
Get the Images
So far, we’ve told Automator to take the images you drag onto the app icon and copy them to the new folder. Now, we need to tell Automator to select the images to modify.
Under Library, select Files & Folders. Next, drag the Get Folder Contents action to the bottom of the workflow.
Convert the Images
The next step is to tell Automator to convert the images. Under Library, select Photos, and then drag the Change Type of Images action to the bottom of the workflow.
A dialog displays asking if you’d like to add a Copy Finder Items action to the workflow so the image files will be copied, preserving your original files.
Because we added an action to the workflow that will create a new folder, we don’t need to make copies of the original files. The New Folder action will take care of that. So click Don’t Add on the dialog box.
On the Change Type of Images action box in the workflow, select your desired image format from the To Type dropdown list. This will take the images you’ve added using the Get Folder Contents action and convert them to the selected image format.
Resize the Images
If you also want to resize your images, you can add an action that will scale them all. Under Library, select Photos. Next, drag the Scale Images action to the bottom of the workflow.
Select whether you want to convert the images to a specific size in pixels or using a percentage from the dropdown list. Enter the number in pixels or the percentage in the box. As mentioned earlier, if you’re working with images of various sizes, you may want to use By Percentage as it works relative to the original size.
You’ll be asked again if you’d like to add a Copy Finder Items action to the workflow to make a copy of the original files. Again, click Don’t Add.
Save the Application and Add It to Your Dock
We’re finished creating our workflow. Now, it’s time to save it as an app. Go to File > Save. Navigate to where you want to save your app and enter a name for the app in the Save As box at the top of the dialog box. Next, click Save.
Finally, drag the Automator app file you just saved to the Dock for easy access.
Convert and/or Resize the Images
To convert and resize a batch of images, select the image files and drag them onto the app icon on the Dock.
Depending on the number and size of the selected images and the speed of your Mac, after a few seconds or minutes, you’ll have a new folder on your Desktop containing the converted and resized images. This preserves the original files, so you don’t have to worry about any irreversible changes.
Batch Convert and Resize Images Using a Third-Party App
There are also third-party apps you can install on your Mac to convert and resize your images. Here are a couple for you to consider.
XnConvert
XnConvert is a free program that makes it easy to batch convert and resize images. In addition, it can perform many other actions on images, like rotating/cropping and adjusting the brightness, contrast, and saturation. You can also use it to apply blur, emboss, and sharpen filters, or add masking and watermarking effects.

Add your images on the Input tab. Next, add an action on the Actions tab to resize the image by pixels, percent, inches, cm, or mm and specify the Width and Height values.
On the Output tab, select the folder for the converted files and choose a format you want to convert to. You can also customize the file names and adjust some other options.
When you’re ready to convert your images, click Convert.
Download:XnConvert (Free)
ImageSize
With ImageSize, you can batch resize, convert, and rename your image files and keep the original aspect ratio from them. You can resize images by pixels, percent, or fixed width or height. Input and output formats include the most popular types like JPG, JPEG, PNG, TIFF, GFT, BMP, and more.
Add your images on the ImageSize window and set the resize options on the Resize tab on the right. Then click the Output tab, pick the image Format you want, and select the Output Folder.
Click Resize Images on the Output tab to resize and convert your images and save them to the selected folder.
Download:ImageSize ($3.99)
Need More Options for Mac Image Conversion?
Now you know how to resize and convert any image on your Mac without any hassle. Whether you do this rarely or every day, these methods make it simple.
If you’re looking for a more powerful tool for jobs like this, have a look at the best image editors for your Mac The 8 Best Free and Paid Image Editors for MacHere are the best free and paid Mac image editors, whether you're a professional professional or amateur shutterbug. Read More .
Image Credit: tan4ikk/Depositphotos